Infant Guidelines
Measuring Infants
Recumbent length refers to stature taken while lying down. Recumbent length is used to measure infants and children less than two years of age. Recumbent length can also used for children two to three years of age who have great difficulty standing on their own; these children must be measured lying down and the measurement should be recorded as recumbent length.
Two people must be used to measure recumbent length. The infant should be wearing only a clean disposable diaper and undershirt. A child over the age of one should be wearing only light clothing. Shoes, sweaters, coats, etc. should be removed.
Procedure for Taking the Recumbent Length
(Adapted from 'How To Weigh and Measure Children', I.J. Shorr, UN, New York, 1986)- Measurer: Cover the board with table paper.
- Assistant: Ask the Assistant to remove hats, barrettes, shoes and socks. "Big" hairstyles will need to be flattened as much as possible. If hair or barrettes interfere with placing the child's head directly against the measuring board, make a note of this on the questionnaire. (Do not attempt to adjust the measurement.)
- Measurer: Provide a brief training to the Assistant on how to hold the child's head.
- Measurer: Place the sliding foot piece at the end of the measuring board and check to see that it is sliding freely.
- Assistant: Ask the Assistant to lay the child down on his/her back on the measuring board and stand directly behind the child's head (Arrow 2). If it is not possible for the Assistant to stand behind the child's head, he/she may stand beside it.
- Measurer: Position yourself on the right side of the child so you can hold the foot piece with your right hand (Arrow 3).
Note: While the infant is on the measuring board, you must hold and control the child so that he/she will not roll off or hit his/her head on the board. - Measurer: Hold the child securely at the waist while the Assistant positions the head.
- Assistant: Ask the Assistant to cup her hands over the child's ears. The Assistant's arms should be straight if possible and she should hold the child securely yet comfortably (Arrow 5). Make sure that the Assistant is cupping her hands. Her hands should not be flat against the child's head and her thumbs should not be touching the child's shoulders (Arrow 4).

Above illustration from: How To Weigh and Measure Children, I.J. Shorr, UN, New York, 1986.- Measurer: Ask the Assistant to place the child's head against the headpiece (Arrow 4).
- Measurer: If the head is not against the headpiece, hold the child at the waist and lift or slide the child towards the headpiece. The Assistant should hold the child's head at all times and guide the head into position.
- Assistant: Check to be sure that the child's head is in the correct position. The line from the hole in the ear to the bottom of the eye socket (Frankfort Plane) should be perpendicular to the board or table (Arrow 6).
- Assistant: Ask the Assistant to place her head directly above the child's head and watch the position of the child's during the entire measurement. Ask her to make certain that the child's chin is not tucked in against his/her chest or stretched too far back.
- Measurer: Position the child's body so that the shoulders, back and buttocks are flat along the center of the board (Arrow 7).
- Measurer: Place your left hand on the child's knees (Arrow 8). Hold the movable foot piece (Arrow 9) with your right hand and firmly place it against the child's heels. A child's legs and feet can be very strong. You may have to straighten them with your hands.
- Measurer: Check the child's position: head against the headpiece with eyes looking straight up, body and legs straight and flat in the center of the measuring board, heels and feet firmly against the foot piece.
- Measurer: When the child's position is correct, read and call out the length measurement to the nearest 1/8". Continue to call out the measurement until the measurement is recorded.
- Measurer: Record the measurement on the data collection sheet under "Recumbent Length". Check to make sure it is accurate and legible.
Note: It is acceptable to take two measurements that agree within 1/8" and use either one of those measurements.Common Errors in Measuring Recumbent Length
- Improper equipment used.
- Hat, hair barrettes or big hairdos not removed.
- Shoes, sandals, socks are not removed.
- Child's head is not in correct position.
- Child's head is not against headpiece.
- Legs are not straightened or properly positioned.
- Heels are not flat against the footboard.
- Heels or legs are not flat against the recumbent board.
- Only one leg is extended rather than both legs.
Weighing Infants
Procedure for Weighing Infants/Children using the Beam Balance Scale
(Adapted from the Training Manual for the New York State Child Growth Monitoring Project; I.J. Shorr, 1994-96.)- Cover scale with paper.
- Place both the pound and the ounce sliding beam weights directly over their respective zeroes.
- Loosen the screw on the adjustable zeroing weight or counter weight. Move it until the beam balances, then tighten the screw on the counter-weight.
- Ask the Assistant to remove the infant's clothing to a dry diaper. A child over one year of age should have shoes and heavy outer garments such as sweaters and coats removed.
- Ask the Assistant to place the child on his/her back or sitting on the tray of the scale. Make sure the child is centered in the tray and is not touching anything off of the scale tray including other parts of the scale.
- Move the pound weight until you find the first notch where the beam falls, then move the weight back one notch.
- Slowly push the ounce weight across the beam until it is balanced. You may need to move it back and forth in small increments several times to reach balance.
- If the beam continues to move (e.g. when the child moves), steady the beam with your hand. It may be difficult to get the beam as steady as you would like; be patient and as careful as possible.
- Read and call out the measurement to the nearest 1 ounce or 1/16 pound. Call out the weight repeatedly until it is recorded.
- Record the weight on the data collection sheet. Make sure it is accurate and legible.
- Have the Assistant remove the child from the tray of the scale and return the weights on the beam to zero in preparation for the next measurement.
Note: It is acceptable to take two measurements that agree within 4 oz and use either one of those measurements.
Procedure for Weighing Infants/Children using a Digital Infant Scale
(From I.J. Shorr, 1997)-
Cover scale with paper.
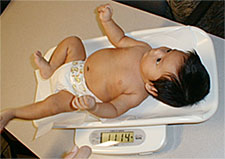
- Activate the scale by turning it on. Zeroes will appear on the display panel. Make sure the scale is on "lb" rather than "kg".
- Ask the Assistant to remove the child's clothing to undergarments.
- Ask the Assistant to place the child on his/her back or sitting on the tray of the scale.
- Make sure that the infant or child is not touching anything off of the scale.
- The weight will appear on the display panel. If the weight changes (e.g. from 15lb 4oz to 15lb 5oz), record either number. Read and call out the weight to the nearest 1 ounce repeatedly until it is recorded.
- Record the weight on the data collection sheet. Check it for accuracy and legibility.
Note: It is acceptable to take two measurements that agree within 4 oz and use either one of those measurements. Common Errors in Measuring Weight of Infants/Children
- Improper equipment is being used.
- The scale is not properly zeroed or balanced.
- Necessary clothing is not removed.
- Child is not placed in center of scale tray.
- Assistant is touching infant/child.
- Infant/child is touching something off the scale or the scale itself.