
Instructor / Course Director Tutorial (Text Version)
Introduction
This tutorial covers the basic duties of Instructors and Course Directors. These duties are based on the Continuing Dental Education (CDE) process.
We will follow the CDE workflow from creating a course to tracking student attendance. We will explain how the roles of Instructor and Course Director fit into this workflow.
Definitions
Before we proceed, however, we need to establish a common language. The following definitions explain the terms used in this tutorial.
- The CDE Administrator oversees all CDE activities for the Division of Oral Health (DOH).
- A Course Director is the single point of contact for the CDE Administrator when dealing with a course. There can be only one Course Director per course. The Course Director can also be (and frequently is) an Instructor.
- Instructor is the general term for a person who presents information in a classroom as part of a course. There can be more than one Instructor for a particular course. Instructors can include visiting lecturers, specialists for a particular aspect of the course, and the like.
- A Dated Course is a course with specific start and end dates associated with it. Students are registered or waitlisted for these courses via the lottery system.
- A “By Request” Course is a course that does not have specific start and end dates associated with it. Course Directors register students for these courses. There is never a waitlist for these courses.
The CDE Process
The CDE process consists of five phases. The phases are Catalog, Course Request and Approval, Pre-Class, Class, and Post-Class. We discuss these phases in detail next.

Phase 1 (The Catalog Phase): Course Directors provide detailed course information. They also identify instructors and approve courses put in the catalog.
Phase 2 (The Course Request and Approval Phase): Instructors and Courses Directors have no direct responsibilities during this phase.
Phase 3 (The Pre-Class Phase): Instructors or Course Directors perform the following duties during this phase:
- send 12-week notifications to registered participants
- upload course materials
- add comments to “Instructor Comments” section
- add details regarding travel, meeting places, etc.
- etc.
Phase 4 (The Class Phase): Instructors teach their courses during the Class phase.
Phase 5 (The Post-Class Phase): During the Post-Class phase, Course Directors are responsible for updating participant attendance records. Course Directors may ask Instructors to assist in this task. We will discuss each of these phases in order.
The Catalog Phase

The catalog phase of the CDE process involves the activities required to create catalogs and courses. The CDE Administrator creates a new catalog each fiscal year.
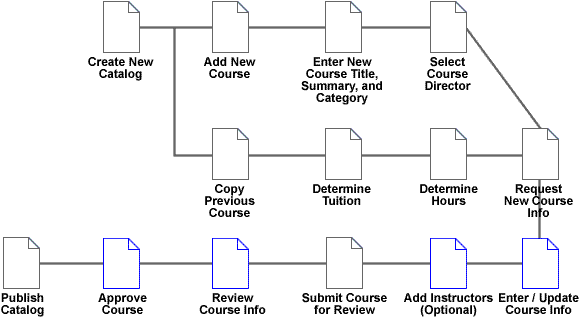
When the CDE Administrator adds a course, she assigns a Course Director for that course. She then sends an email to the Course Director requesting an update of the course information.
The Course Director adds or changes the course information or Instructors. He chooses the audience or audiences for the course. To perform these updates, the Course Director uses the My Instruct and Edit Course pages, discussed next.
The My Instruct Page
The My Instruct page is the starting point for all Instructor and Course Director activities. It is the central source of information concerning courses scheduled for the year. Open the My Instruct page with the “My Instruct” tab in main navigation. To access the My Instruct page, your login must identify you as an Instructor or Course Director.
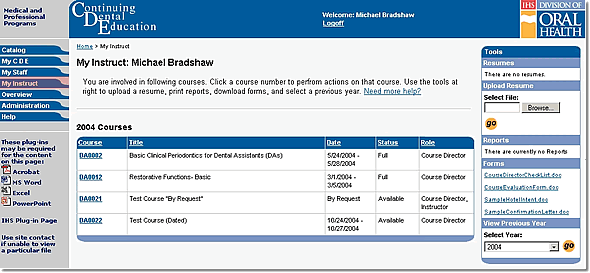
One very important aspect of the My Instruct page is the box on the right side of the page.
Of particular importance is the “Upload Resume” section. Use this feature to maintain a current resume on the CDE server. You can add and remove resumes as needed here. DANB and AGD conduct audits of teaching qualifications, and they will review these resumes periodically.
Use the Reports list to produce “canned” reports. These reports are printable from your browser.
To download forms that will aid in your offline duties use the Forms list.
To view information on courses you were involved in during previous years use the View Previous Year tool.
The table in the main area of the page lists all of the courses you are working with this year. The columns indicate:
- course number
- course title
- date range for the course
- status or availability of the course
- your role in the course
Clicking the course number will give you a view of the course details. Course Directors can only update new courses in this phase. Therefore, clicking the course number will automatically go to the Edit Course page. We will discuss the Edit Course page next.
The Edit Course Page
The Edit Course page allows changing and adding course information. To edit a course you must have a Course Director or CDE Administrator login. The tabs across the top of the form split the course information into seven categories.
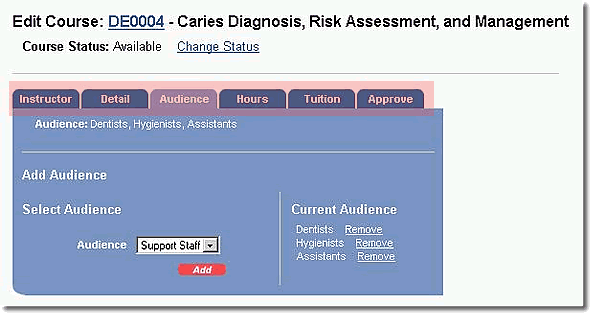
The “Instructor” tab allows a Course Director or the CDE Administrator to add and remove Instructors for a course. The CDE Administrator can also add or change a Course Director using this tab.
The “Detail” tab permits entry of course details. This information includes:
- Title
- Facility
- City and State
- Start and End Dates
- Level
- Quota Minimum and Maximum
- Summary
- Learning Objectives
- Prerequisites
- Travel information
The “Audience” tab allows the CDE Administrator or a Course Director to choose the audience for the course. The choices available are:
- Assistants
- Dentists
- Hygienists
- Support
Note: Any change submitted from the Instructor, Detail, or Audience tab means you accept the course assignment.
The “Hours” tab allows the CDE Administrator to identify the hours associated with the course. The Course Director does not use this tab. The hour types are:
- Dental Assisting National Board (DANB) clinical or non-clinical
- Academy of General Dentistry (AGD)
The “Tuition” tab is where the CDE Administrator calculates or enters the course tuition. The Course Director does not use this tab.
The “Fees” tab allows the CDE Administrator to assign fees to courses when required.
The “Approve” tab shows the final course information summary. It allows the CDE Administrator to request final approval from the Course Director to publish the course. It also provides a means for the Course Director to approve or deny the course and make comments about the decision.
The CDE Administrator confirms all course information using the “Approve” tab. She then emails the Course Director requesting review of the course. This requires the Course Director to review the course contents one last time.
Reviewing and approving courses is a vital step in the creation of a catalog. This step ensures that the information in the course is accurate and complete. This information is presented in the printed catalog and on the CDE web site.
Course Directors must approve their courses. Only approved courses are included in the published catalog.
The CDE Administrator publishes the catalog to the web site. Then we are ready for the next phase of the CDE process - Course Request and Approval.
The Course Request and Approval Phase

The Course Request and Approval process typically takes place during the month of October. This is the scheduled pre-lottery nomination period. Instructors and Course Directors have no direct responsibilities in this phase of the CDE workflow.
After the Course Request and Approval phase, the CDE Administrator initiates the lottery. The lottery runs by 15 November. The lottery randomly selects who is registered and waitlisted for all non-“By Request” courses.
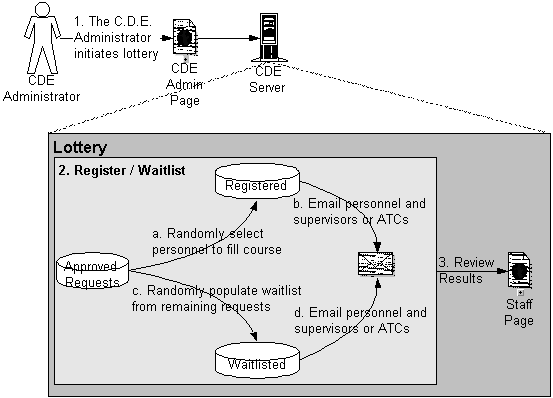
The lottery creates a registered students list and a waitlist for each course. As the lottery selects students and places them on one of these lists, system-generated emails are sent to each student and the student's supervisor.
The Pre-Class Phase

Activities after the lottery runs, but before the actual class is held, fall into the Pre-Class Phase of the CDE workflow. The information you need during this phase is located on the Course Detail page.
Instructors and Course Directors access course details from the My Instruct page. Remember that before publication, clicking the course number takes you to the Edit Course page. After publication, clicking the course number will take you to the Course Detail page. We discuss the Course Detail page next.
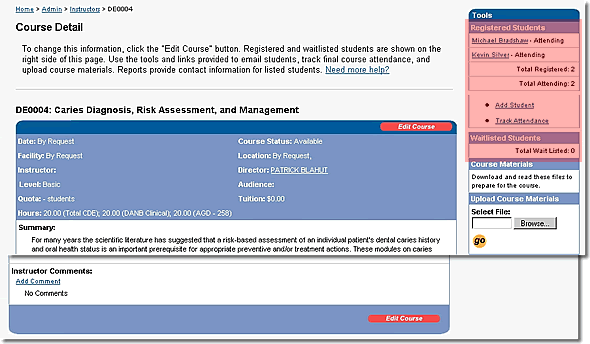
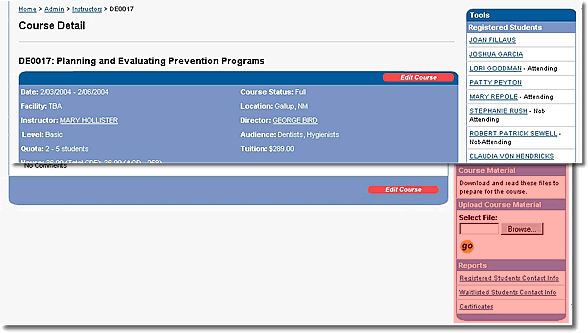
The Course Detail Page
The Course Detail page contains all information for the course. The Course Detail page presents information in the same format as the summary on the Edit Course page “Approve” tab. The Course Detail page Tools area on the right side of the page provides several ways of contacting students. It also provides a means of saving and removing course materials on the CDE server for student use.
The Registered Students list indicates the names of personnel registered for the course. At the bottom of the list are tallies for students registered and attending. If the course is still available, and more personnel request it, the CDE system will assign registered or waitlisted to personnel on a first-come; first-served basis.
The Waitlisted Students list beneath the Registered Students list indicates the names of personnel waitlisted for the course. If a registered student indicates that he will not attend, the CDE system will move the first person from the waitlist into the vacant place. All other waitlisted students will move up one on the waitlist.
Contacting Students
Contact with students before a class can encourage attendance. To contact students, go to the specific Course Detail page.
Some reasons for contacting students are as follows:
- 12-Week notifications (Required)
- Opening other courses with the same content to accommodate long waitlists
- Enhance the learning experience
- Prompt students to arrange for travel orders and tuition payment
You may have noticed the links under the Registered Students and Waitlisted Students lists. Let's discuss these links.
Course Directors are required to send a notification letter to all registered students at approximately 12 weeks before the start of a class. The CDE web site provides a shortcut for this task with the “Send 12-Week Notification” link. This pre-defined email also requests that the student confirm attendance. Its use will help you reduce the course's “no-show” rate. You are encouraged to taylor the pre-defined message.
The CDE web site also provides these generic links:
- “Email Registered Students”
- “Email Attending Students”
- “Email Waitlisted Students”
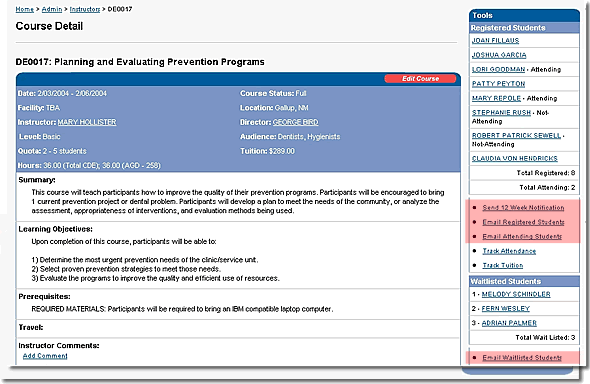
All of these email links use your default email system to send messages. They pre-populate the “TO,” “CC,” and “FROM” sections of the email message. The “TO” section is filled with email addresses for those students who have them. The “CC” section is filled with the email addresses of the students' supervisors. The “FROM” section is filled with your email address. You are encouraged to edit the “SUBJECT” and the body of the email to fit your needs.
Course Materials
The Course Materials tool allows Instructors and Course Directors to upload course materials to the CDE server. Course materials include any document used to describe a course or enhance the learning process. Course materials typically include the following:
- Course Outlines or Syllabi
- Presentation Materials
- Lesson Plans
- Handouts
- Reading Lists
So why would we want to allow students to see these materials? Adult learners who know what to expect from a course are more likely to succeed. Course materials also give participants a clearer expectation of the course's contents and should further reduce the “no-show” rate.
Reports
The reports for the Course Detail page involve the registered and waitlisted students for the course. They include lists of contact information for these students. You can add, edit, and delete comments within courses. Although comments are not required, they can provide important information and learning opportunities for students. Comments can include:
- Pre-class reading assignments
- Pre-tests
- Post-course activities lists
Course Comments
To add, edit, or delete a comment start on the Course Detail page. Keep in mind that only registered students can view these comments. The “Add Comment” link leads to a simple form that allows text entry and submission. The CDE system automatically adds your name and the date to the comment upon submission. The “Edit Comment” link leads to a similar form that allows both editing and deleting comments previously added.
The Class Phase

You know the Class phase already. In this phase, you present the course to the students. In addition, during this phase you
- take attendance
- have students complete CDE request forms
- ask students to fill out evaluation forms
The Post-Class Phase

The post-class phase of the CDE workflow involves the recordkeeping required to ensure proper certifications and maintenance of credentials. Two links on the Course Detail page are associated with the post-class phase: “Add Student” and “Track Attendance.” We discuss these links in detail next.
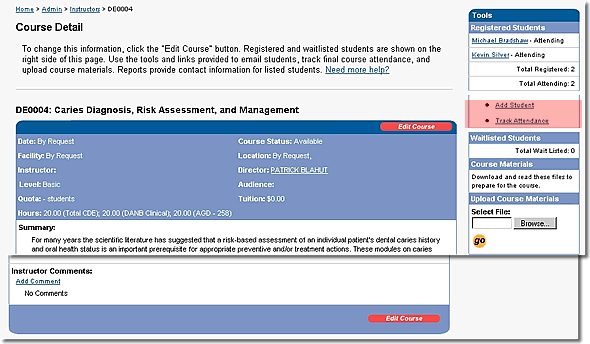
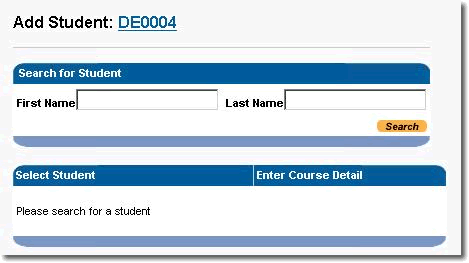
“By Request” courses are not like other courses in the catalog. The lottery does not populate the Registered Students list for these courses. They require the Course Director to add students before tracking attendance. To add a student, click the “Add Student” link on the Course Detail page.
The CDE web site allows addition of a single student at a time to a “By Request” course. The form used to add a student is the Add Student form. The Add Student form provides spaces for entering a student's name, start date, and end date. Submit this form to add the student to the Registered Students list.
The process of tracking attendance for a student is the same whether the lottery added the student to the course or the Course Director added the student. The CDE system provides a simple form for entry of attended hours and completion date. To enter attendance for students click the “Track Attendance” link.
The Track Attendance Page
The Track Attendance form lists all attending students. You can enter attendance for a single student or for as many students as you need by using this form. Another form is used for detailed information on students who partially attended the course. To provide partial attendance details, click the “View Details” link on this form.
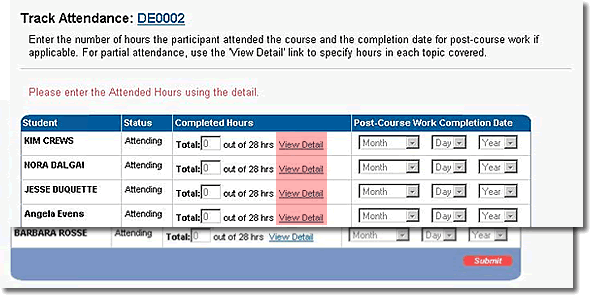
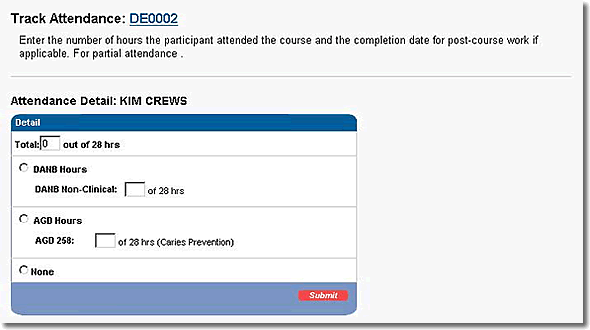
The Attendance Detail Page
The Attendance Detail form allows entry of specific details on the number of DANB and AGD hours actually attended by the student. AGD hours are maintained for CERP purposes.
When you submit the attendance for a student, the CDE system updates the student's transcript information, marks the student's status as complete, and removes the name from the attending students list.
Summary
In this tutorial, you learned the basic duties of Instructors and Course Directors based on the Continuing Dental Education (CDE) process. You followed the CDE process from course creation through student attendance tracking.