
CDE Administrator Tutorial (text version)
Introduction
This tutorial covers the basic tasks of the Continuing Dental Education (CDE) Administrator. These duties are based on the CDE process.
We will relate the duties of the CDE Administrator to specific phases of the CDE workflow from creation of a catalog to tracking student attendance. We will explain how the role of CDE Administrator fits into this workflow and how this role supports others in the Division of Oral Health.
Logging into the CDE Web Site
The Indian Health Service (IHS) Division of Oral Health (DOH) restricts full use of the CDE web site to Division personnel. To perform any CDE Administrator task, the user must be logged into the CDE web site. The login must identify the user as the CDE Administrator.
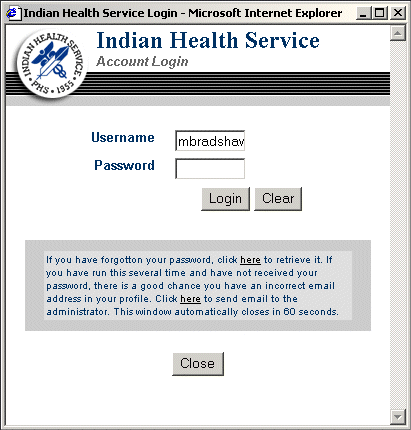
The CDE Home page provides a means of logging into the IHS Internet. The banner changes after login to welcome the user and provide a quick logout link.
![]()
The CDE Process
The CDE process consists of five phases. The phases are Catalog, Course Request and Approval, Pre-Class, Class, and Post-Class. An overview of these phases follows.

Phase 1: The Catalog Phase
The CDE Administrator creates a catalog base for each fiscal year and adds courses to it. Course Directors provide detailed course information, identify instructors, and approve courses. Other DOH personnel have no direct responsibilities during this phase.
Phase 2: The Course Request and Approval Phase
The Course Request and Approval phase takes place during the nomination period. This is typically the month of October.
When personnel request courses using the CDE web site, their supervisors or Area Training Coordinators (ATCs) receive emails requesting approval. Supervisors or ATCs must approve course nomination for their personnel before the lottery runs to ensure that staff members have a fair chance of being registered.
The duties of the CDE Administrator encompass all supervisor tasks to assist during this phase.
Phase 3: The Pre-Class Phase
The CDE Administrator initiates the lottery during the Pre-Class phase. Instructors or Course Directors contact students registered in their courses, upload course materials, and input comments into course descriptions during this phase. Other DOH personnel may be required to download course materials and arrange for travel during this phase of the workflow.
The CDE Administrator may need to assist instructors or Course Directors with their duties during this phase. Therefore the duties of the CDE Administrator also encompass all instructor and Course Director tasks.
Phase 4: The Class Phase
Instructors teach their courses during the Class phase. Personnel who are registered for courses attend them in this phase of the process. The CDE Administrator has no direct responsibilities during this phase.
Phase 5: The Post-Class Phase
During the Post-Class phase, Course Directors are responsible for updating participant attendance records. Course Directors may ask instructors to assist in this task.
The duties of the CDE Administrator include these tasks to assist instructors and Course Directors during this phase. We will discuss all of the CDE Administrator duties for administration as well as for assisting supervisors, and instructors and Course Directors and relate them to the CDE workflow.
Catalog Administration
Catalog Administration deals with all tasks required to create, populate, and maintain a CDE catalog. This activity occurs during the Catalog phase of the CDE process.
Catalog Creation
The CDE Administrator creates a new catalog each fiscal year. When the CDE Administrator adds a course, a Course Director is assigned to that course. An email is sent to the Course Director requesting an update of the course information.
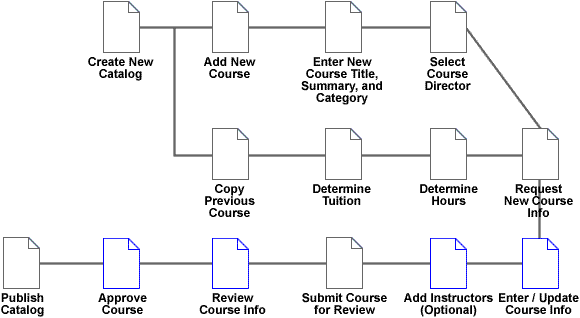
The Course Director adds or changes the course information or instructors and chooses the audience or audiences for the course. If the Course Director cannot perform these tasks for any reason, the CDE Administrator can.
To create a new catalog the CDE Administrator uses the Admin Catalog and Create Catalog pages.
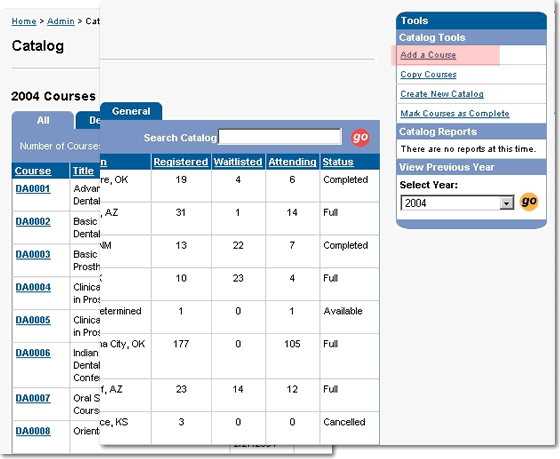
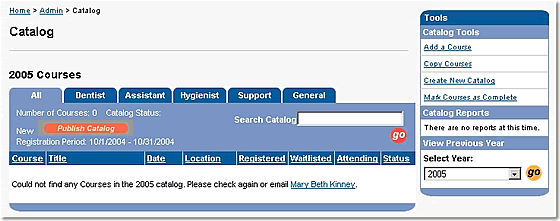
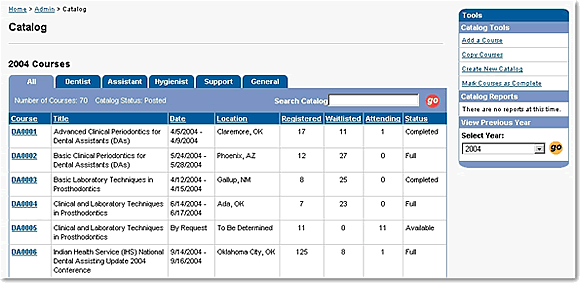
The Admin Catalog Page
The Admin Catalog page is the starting point for all CDE Administrator course-related activities. It is the central source of information concerning courses scheduled for the year.
Open the Admin Catalog page with the “Catalog” link under the “Administration” tab in main navigation. To access the Admin Catalog page, the login must identify the user as the CDE Administrator.
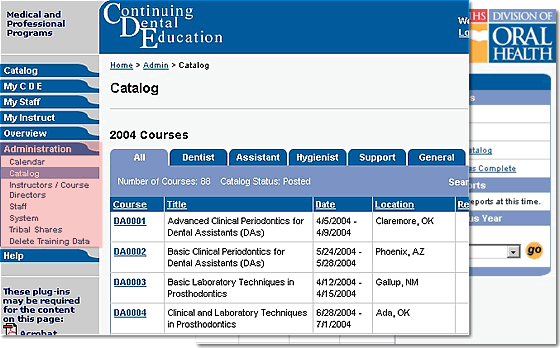
The table in the main area of the Admin Catalog page lists all courses in the CDE catalog with columns indicating:
- course number
- course title
- course date range
- course location
- number of registered personnel
- number of waitlisted personnel
- number of attending personnel
- course status / availability
Clicking one of these headings will sort the information by that column.
Clicking a course number opens a view of the course details.
The Right-Side Box
One very important aspect of the Admin Catalog page is the box on the right side of the page. This box provides tools for administrative tasks.
The CDE Administrator can use the Catalog Reports list to produce “canned” reports, printable from the browser, or use the View Previous Year tool to view previous catalogs. Using the Catalog tools, the CDE Administrator can mark courses completed, create or copy courses into the catalog, and create a new catalog.
Clicking the “Create New Catalog” link opens the Create Catalog page, discussed next.
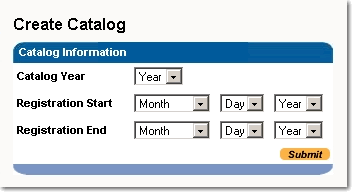
The Create Catalog Page
The Create Catalog page allows the CDE Administrator to produce a new catalog up to five years in advance. The information needed includes the fiscal year of the catalog and the beginning and ending dates of the nomination period. The nomination period is typically the month of October.
When this form is submitted, a new, blank catalog is created that can be filled with new or copied courses using the process of Course Administration.
Course Administration
Course Administration is the general term for all activities that directly affect a course and its details as displayed on the Course Detail, Catalog, and Admin Catalog pages. Course Administration may be needed during any phase of the CDE process.
For example, the Course Administration tasks associated with the Catalog phase of the CDE process include:
- Adding courses to the catalog
- Assigning Course Directors
- Adding Instructors to a course
- Requesting updates, adding, or updating course details
- Identifying the audience or audiences for a course
- Determining credits (hours) and tuition
- Changing Course Directors
Adding Courses to the Catalog
Clicking the “Add a Course” link on the Admin Catalog page opens the Add Course page, discussed next.
The Add Course Page
The Add Course page allows the CDE Administrator to add information required to define a new course. The information needed includes the title of the course, a summary of the course, and a category for the course.
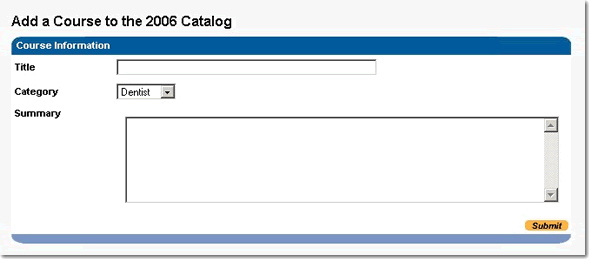
The category indicates the prefix used in the catalog when numbering the course and will be one of the following:
- Dentist (DD) for dentists only
- Assistant (DA) for Dental Assistants only
- Hygienist (DH) for Dental Hygienists only
- Support (DS) for support personnel (non-clinical) only
- General (DE) courses for more than one area of expertise, such as Dental Assistants and Hygienists
Warning: The selection of a category depends on the audience or audiences for which the course is intended. A course category cannot be changed once it is submitted.
When the form is submitted, the user is returned to the Admin Catalog page for further action.
Copying Courses to the Catalog
Clicking the “Copy Courses” link on the Admin Catalog page opens the Copy Courses page. This allows the CDE Administrator to copy a course from the current catalog or a previous catalog to the current catalog.
The Copy Courses Page
The Copy Courses page is a two part form that allows the CDE Administrator to select a course or courses from previous catalogs (or the current catalog) and duplicate them with different course numbers. This technique can be used to create additional “sessions” of a course.
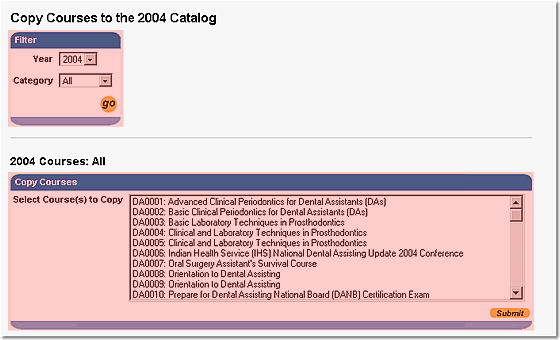
The top half of the form permits identification of a specific catalog fiscal year and a catalog category from which to select courses.
The bottom half of the form allows selection of one or more courses from the identified year and category. Use Ctrl+click to select multiple courses.
Warning: The course is duplicated in every detail except the course number. The category of the course will remain the same. If the category must change, use the “Add a Course” link to create a new course with the appropriate category and cut and paste information as needed from the original course.
Editing Course Information
Once a course is created or copied, it must be edited to ensure that the information contained is correct for the current catalog. Clicking a course number on the Admin Catalog page opens one of two pages: the Course Detail page or the Edit Course page. The Course Detail page is opened if the course selected has a status of other than “New.” The Edit Course page, discussed next, opens for courses with a status of “New.”
The Edit Course Page
The Edit Course page allows changing and adding course information. To edit a course the user must have a login that identifies them as the Course Director for the course or as the CDE Administrator.
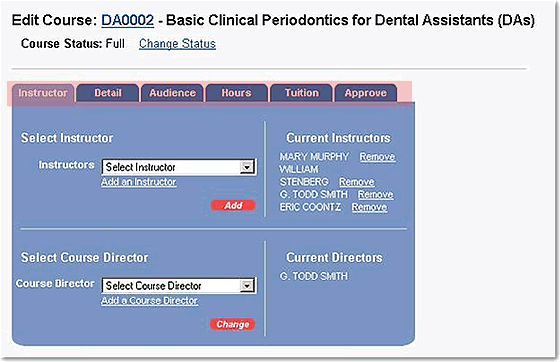
The six tabs across the top of the form split the course information into groups:
- Instructor information
- course Detail information
- course Audience selection
- course Hours information
- course Tuition calculation / selection
- Approve course
The “Instructor” tab allows a Course Director or the CDE Administrator to add and remove Instructors for a course. The CDE Administrator can also add or change a Course Director using this tab.
The “Detail” tab permits entry of course details. This information includes:
- Title
- Facility
- City and State
- Start and End Dates
- Level
- Quota Minimum and Maximum
- Summary
- Learning Objectives
- Prerequisites
- Travel Information
The “Audience” tab allows the CDE Administrator or a Course Director to choose the audience for the course. The choices available are:
- Assistants
- Dentists
- Hygienists
- Support
The “Hours” tab allows the CDE Administrator to identify the credits (or hours) associated with the course. The hour types are:
- Dental Assisting National Board (DANB) clinical
- DANB non-clinical
- Academy of General Dentistry (AGD)
The “Tuition” tab is where the CDE Administrator calculates or enters the course tuition.
The “Approve” tab shows the final course information summary. It allows the CDE Administrator to request approval from the Course Director. It also provides a means for the Course Director to approve or deny the course and make comments about the decision.
The CDE Administrator confirms all course information using the Approve tab and emails the Course Director requesting review of the course. This requires the Course Director to examine the course contents one last time.
Note: Reviewing and approving courses is a vital step in the creation of a catalog. This step ensures that the information in the course is accurate and complete. This information is presented in the printed catalog and on the CDE web site. Course Directors must approve their courses. Only approved courses are included in the published catalog.
The CDE Administrator can use the “Change Status” link at the top of the Edit Course page at any time to change the status of a course. Therefore, if the Course Director cannot perform tasks that make changes to the status, the CDE Administrator can manually indicate the new status.
Publication
Once courses are added or copied, reviewed, and approved by the Course Directors, the CDE Administrator publishes the catalog to the web site. Clicking the “Publish Catalog” button on the Admin Catalog page checks the catalog for scheduling conflicts and informs the CDE Administrator of any found.
If conflicts occur, the process must be halted, the conflicts resolved, and the publication process begun again.
After all scheduling conflicts are resolved, clicking the “Publish Catalog” button changes all “Final” statuses to “Available” and makes the new catalog the default for all actions on the CDE web site. Then we are ready for the next phase of the CDE process – Course Request and Approval.
Note: Courses can still be added to the catalog after publication. Just remember to perform all of the activities required for any courses added.
Nomination Oversight
The CDE Administrator is ultimately responsible for ensuring proper nominations. To this end, the CDE Administrator supports supervisors and ATCs throughout the DOH in performing Nomination Oversight. This process involves:
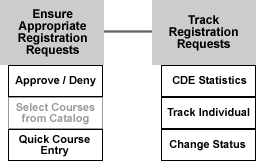
- Ensuring appropriate course requests by staff
- Tracking the status of staff CDE requests
Ensuring Appropriate Course Requests
All requests made by staff members should be approved before the lottery runs. The CDE Administrator can ensure that appropriate courses are requested using either of two options:
- Approve or Deny requests made by staff members
- Quick entry of course numbers for staff members
Approving or Denying Course Requests
All course requests must be approved. In the event that a supervisor or ATCs cannot perform their approval duties, the CDE Administrator can do approvals. The approval process begins when the supervisor or ATCs receives an email from a staff member requesting approval for a course.
To perform approvals, the CDE Administrator uses the Admin Staff and Modify Status pages discussed next.
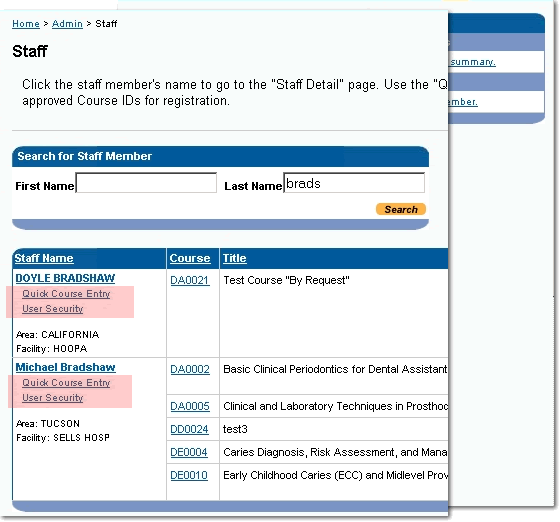
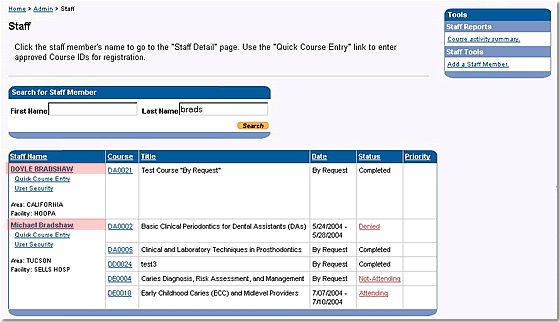
The Admin Staff Page
The Admin Staff page is the starting point for all CDE Administrator staff-related activities. It is the central source of information concerning courses for staff members within the Division.
Open the Admin Staff page with the “Staff” link under the “Administration” tab in main navigation. To access the Admin Staff page, the login must identify the user as a CDE Administrator.
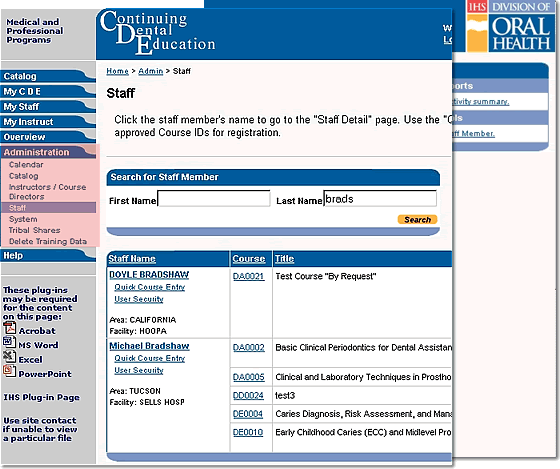
One very important aspect of the Admin Staff page is the box on the right side of the page. These tools allow the CDE Administrator to easily complete many tasks. The Staff Reports list produces “canned” reports. These reports are printable from the browser.
The main area of the Admin Staff page lists personnel within the DOH alphabetically and the course or courses they are requesting. The “Search for Staff Member” function can be used to find specific personnel. It can also be used to find, for example, all personnel whose last name starts with “M” or even “Mar.”
The columns in the main table indicate:
- staff name
- course number
- course title
- course date
- staff member's status in the course
- priority that the staff member places on the course
The status will be “Pending” for any course that has recently been requested. The status changes to indicate modifications made by the staff member, the supervisor or ATC, or the CDE Administrator. Clicking the status for a particular course will open the Modify Status page.
The Modify Status Page
The Modify Status page allows supervisors and the CDE Administrator to change personnel status within courses as needed. This page also maintains a history of all changes made to a particular request. The Modify Status page can be used during any phase after Course Request and Approval.

On the right side of the Modify Status page is a pull-down list of available status options. These options will change appropriately as needed to provide only valid choices. When changing the status for a “Pending” request, the choices available are:
- Approved
- Denied
A text area is provided below the status pull-down list to explain why a specific option was chosen. These comments will document decisions and reduce confusion.
When this form is submitted, an email is sent to the staff member and their supervisor informing them of the status change. The CDE web site updates the status history, and returns to the Admin Staff page for further actions as required.
General Changes in Staff Member Status
The status of a staff member can be changed at any time it is required. If the CDE Administrator must change the status of personnel, she can do this using the Admin Staff and Modify Status pages. The process is the same as that used to approve pending requests as just discussed.
Some of the reasons for changing a staff member's status might include:
- The staff member's schedule no longer allows attendance in the course
- Neither the staff member nor the supervisor has access to the Internet, so the CDE Administrator must make changes for her
- The staff member cannot attend due to other circumstances beyond their control
Warning: Be very careful when changing status. After changing a status “Registered” or “Attending” to “Not Attending,” changing the status back to “Attending” will place the staff member at the end of the Waitlisted Students list.
Selecting Courses for a Staff Member
If personnel do not have direct access to the Internet and the CDE web site, supervisors or ATCs may be required to select courses for them. If the supervisor or ATC cannot perform this task, the CDE Administrator can indicate courses for staff members. This task may be required during any phase of the workflow from the Course Request and Approval phase on.
The CDE Administrator uses the Admin Staff and Quick Course Entry pages to select courses for staff members.
Note: Supervisors and the CDE Administrator can choose courses for personnel at any time. They are not restricted to nominating staff only during the nomination period. Staff members can select courses at any time, as well, but can only request courses once. After requesting approval, personnel cannot request again.
The Admin Staff page of the CDE web site provides a method for choosing courses for staff and a method for setting their access to the CDE web site. Under each staff member name on this page are two links:
- “Quick Course Entry” to quickly enter one or several courses for the staff member
- “User Security” to identify the roles allowed for a staff member on the CDE web site or change the person's email address
The “Quick Course Entry” link on the Admin Staff page starts the Quick Course Entry Wizard. This wizard makes it easy to enter multiple course numbers for a single staff member. The Quick Course Entry Wizard is a two-part form.
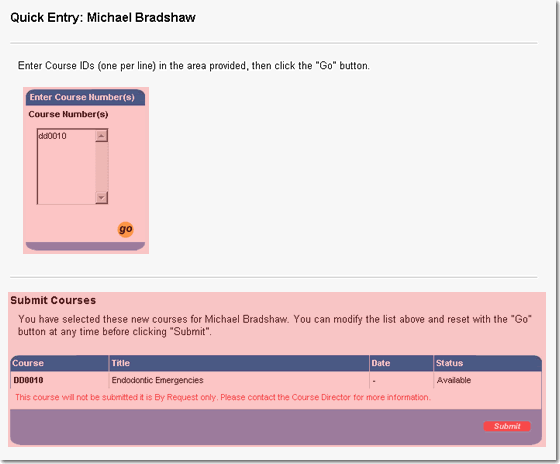
The first part of the form consists of a text area for entering course numbers. Once the CDE Administrator enters all of the course numbers, clicking the “go” button opens the second part of the form.
The bottom part of the Quick Course Entry page verifies that the courses entered are available. It also verifies that the staff member, a supervisor or ATC, or the CDE Administrator has not taken other actions on them.
Once this is confirmed, clicking the “Submit” button will finalize the Quick Course Entry Wizard and approve the entered courses for nomination. The lottery will determine the actual registrations for courses.
Setting CDE User Security Roles
As mentioned earlier, the Admin Staff page of the CDE web site provides a method for setting user access to the CDE web site using the “User Security” link. The CDE Administrator is responsible for securing the CDE web site. This task can be performed during any phase of the CDE workflow. Clicking the “User Security” link opens the User Security page.
The User Security Page
The choices available for setting user access to the CDE web site are listed at the top of the User Security page. Multiple roles can be assigned to any individual. We discuss each of these roles in detail next.
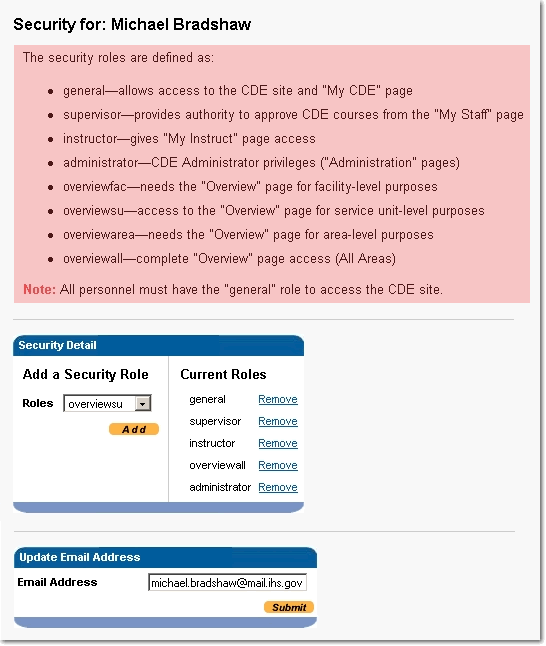
The General role provides basic access to the CDE site; all Division personnel must have this role to be permitted use of the CDE web site. This level includes access to the My CDE, Course Detail, Modify Status, Request Approval: Prioritize, and Request Approval: Confirm pages. The role is also required to activate the “Select Course” button on the Catalog page.
The Supervisor role permits access to the My Staff, Request Nomination: Select, Request Nomination: Confirm, and Quick Course Entry pages.
Note: It is important to keep in mind that the Supervisor role identifies a person with responsibility for approving CDE course requests. This person need not be a direct supervisor.
The Instructor role permits the user access to the My Instruct and Edit Course pages. This role is shared by instructors and Course Directors.
The Administrator role identifies the user as the CDE Administrator and permits access to all pages and functions within the CDE web site.
The Overviewfac role permits access to the Overview page at the facility level only.
The Overviewsu role grants the user access to the Overview page at the Service Unit level and all facilities included in that Service Unit.
The Overviewarea role grants access to the Overview page at the Area level, including all Service Units and facilities included in that Area.
The Overviewall role permits the user access to the Overview page at the Division level. All Areas, Service Units, and facilities can be viewed. This role is given to the CDE Administrator and may be given to Division-level management personnel.
Miscellaneous Administration
All other activities performed by the CDE Administrator are grouped under the term “Miscellaneous Administration.” Miscellaneous Administration activities can occur during any phase of the CDE workflow. Some of these activities are listed here:
- Adding / editing / deleting announcements
- Initiating the lottery
- Reviewing CDE use statistics
- Tracking course attendance
- Contacting personnel
The CDE Administrator can use the CDE web site to perform all Miscellaneous Administration tasks.
To perform these duties the CDE Administrator uses a variety of pages within the CDE web site, such as:
- Admin System to add and edit announcements and begin the lottery
- Admin Staff for some reports
- Overview to track statistics and some reports
- Course Detail to track course attendance, and contact students and Instructors or Course Directors
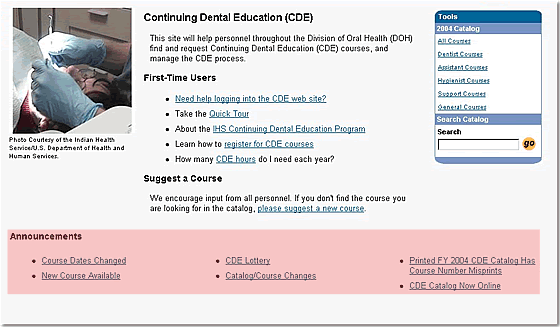
Announcements
The CDE web site includes announcements on the home page. These announcements are created and edited by the CDE Administrator. Announcements can be created, edited, or deleted during any phase of the CDE process. The user opens an announcement from the CDE Home page by clicking the announcement title.
Adding an Announcement
The CDE Administrator can add, edit, or delete announcements during any phase of the CDE workflow. To add, edit, or delete an announcement, the CDE Administrator uses the Admin System page.
The Admin System Page
To open the Admin System page, click the “System” link under the “Administration” tab in main navigation. The user's login must identify them as a CDE Administrator.
The Admin System page is the starting point for all CDE System Administration tasks. These tasks include initiating the lottery and managing announcements.
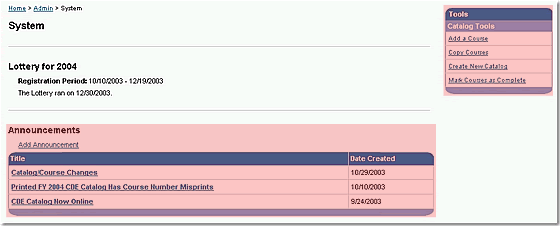
The box on the right side of the Admin System page provides the CDE Administrator with the same catalog-related links that the Admin Catalog page provides. In this way, the CDE Administrator can also perform all tasks associated with the administration of the CDE catalog from the Admin System page.
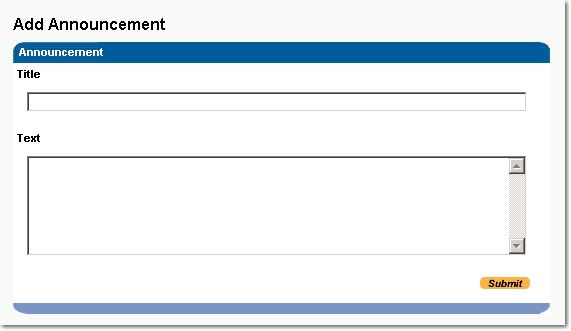
The Announcements section of the Admin System page provides a list of all active announcements currently on the CDE Home page. Clicking the “Add Announcement” link at the top of this list allows the CDE Administrator to add an announcement to the CDE Home page.
The required information for an announcement is:
- a descriptive title (or headline)
- the text content of the announcement
When the form is submitted, the CDE web site appends the date and the contributor's name to the announcement information, and adds the title to the CDE Home page as a link to open the content.
Editing / Deleting an Announcement
Clicking the announcement title on the Admin System page opens the Edit Announcement page. The Edit Announcement page allows the CDE Administrator to change the announcement.
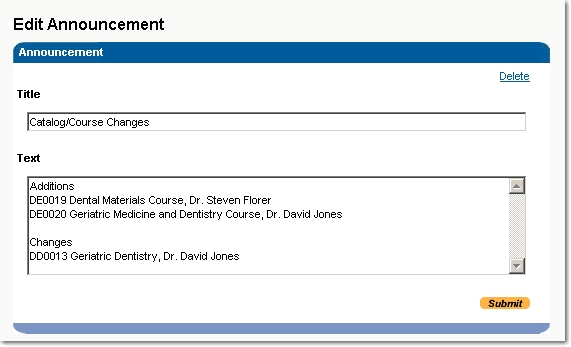
The Edit Announcement page also provides a link to delete the announcement.
The Lottery Process
The lottery runs after the nomination period, which is typically the month of October. That means the lottery runs in November. The lottery signifies the beginning of the Pre-Class phase of the CDE workflow.
Personnel may ask how the lottery works, and whether it is fair. The CDE Administrator must understand the process to explain it to Division staff. The following explanation should help in this regard.
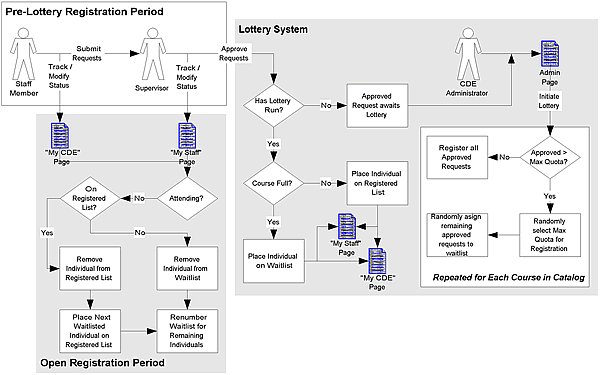
Step 1
The CDE Administrator initiates the lottery using the Admin System page.
As mentioned earlier in this tutorial, the Admin System page is the starting point for all CDE System Administration tasks, including initiation of the lottery.
The main content of the Admin System page concerns the lottery and the announcements displayed on the CDE Home page. For the lottery, information is provided on when the lottery ran. If the lottery has not run, a link is provided to allow the CDE Administrator to begin the lottery process for the current catalog.
Step 2
Step two of the lottery is a process that the computer repeats for each course in the current catalog.
- Randomly select people from approved requests to fill course and email personnel and their supervisors or ATCs
- If there are more approved requests than room in the course, randomly select from remaining requests to create waitlist and email personnel and their supervisors or ATCs
Step 3
In step three, personnel review the results of the lottery. The CDE Administrator views the results on the Admin Staff page. Supervisors and ATCs view the results of the lottery on the My Staff page. Other DOH personnel view the results on the My CDE page.
Note: Requests for courses approved after the lottery runs will be assigned “Registered” or “Waitlisted” status as appropriate for the course on a first come, first served basis.
Reviewing CDE Statistics
With the Overview page, the CDE Administrator can quickly determine the CDE enrollments and other statistics for an entire Area, Service Unit, or facility. CDE statistics can be viewed using the Overview page during any phase of the CDE workflow.
The Overview Page
The Overview page provides many statistics pertinent to CDE Administrator duties. The CDE Administrator accesses the Overview page using the “Overview” tab in main navigation.

The tabs across the top of the page separate the different levels of information.
To narrow the scope of the information displayed on the Overview page select an Area, Service Unit, or facility from the pull-down list provided. Clicking the “go” button updates the display for that selection.
Note: Using the tabs in the order “Area,” “Service Unit,” “facility” and selecting specific items from the pull-down lists on each tab, the CDE Administrator can determine specific statistics for the Division to the facility level.
Each number in the table indicates the count of personnel registered, waitlisted, or confirmed attending for the indicated course. The information shown is specific to the Area, Service Unit, or facility chosen for display.
Clicking a number in the table opens a list of the personnel included in the number.
Tracking Nomination Request Status
Using the status column of the Admin Staff page, the CDE Administrator can track all of the requests from all Division personnel at any time. However, this action is usually only required during the Course Request and Approval phase or the Pre-Class phase of the CDE workflow.
The statuses that the CDE Administrator can expect to see include:
- Pending – staff requests approval
- Approved – Supervisor approves
- Denied – Supervisor denies
- Registered – staff registered
- Waitlisted – staff on course waitlist
- Attending – staff attending
- Not Attending – staff not attending
- Completed – staff completed requirements
Contacting Personnel
The CDE Administrator may need to contact personnel during any phase of the CDE workflow. Contact with Instructors and Course Directors may be needed to coordinate new courses in response to added demand for a particular content.
Some reasons for contacting students are as follows:
- Sending 12-Week notifications (Required)
- Opening other courses with the same content
- Enhancing the learning experience
- Reminding students to arrange for travel orders, etc.
Contacting Students
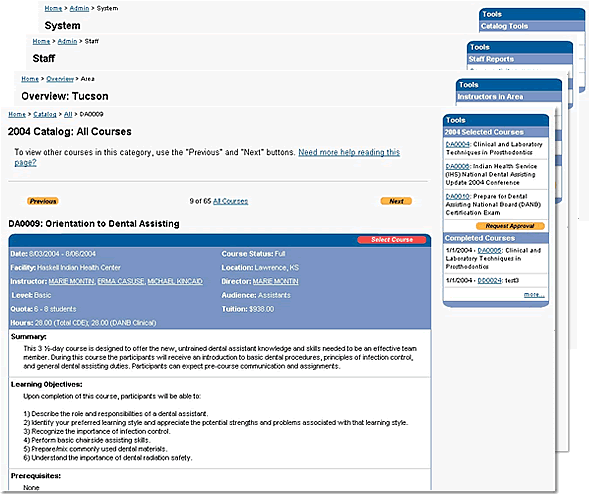
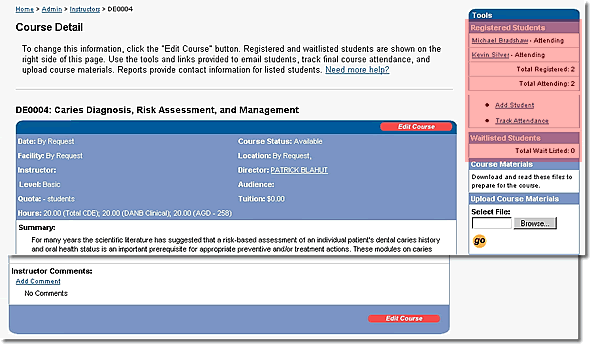
Contact with students before a class can encourage them to attend. To contact students in a specific course go to the Course Detail page. Clicking a Course Number on the Admin Catalog page opens the Course Detail page for that course.
The Course Detail Page
Course Directors are required to send a notification letter to all registered students at approximately 12 weeks before the start of a class. If the Course Director cannot perform this task, the duty falls to the CDE Administrator.
The Tools area on the right side of the Course Detail page provides a means of saving and removing course materials for student use on the CDE server. It also provides several ways of contacting groups of students: registered, waitlisted, and attending students.
The Course Detail page provides a shortcut for sending 12-week notices with the “Send 12-Week Notification” link. This pre-defined email also requests confirmation that registrants will attend. Its use will help reduce the course “no-show” rate. The CDE Administrator can change the pre-defined message.
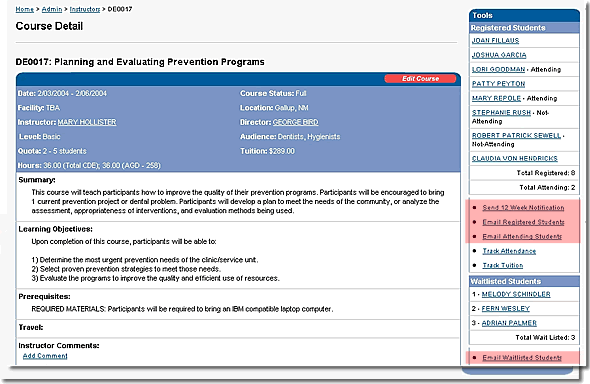
Other Contact Methods
The CDE web site also provides these links for contacting students:
- Email Registered Students
- Email Attending Students
- Email Waitlisted Students
These links open a blank email message addressed to the appropriate students and their supervisors or ATCs.
How the Emails Work
All of these email links use the default email system on your computer to send messages. They pre-populate the “TO,” “CC,” and “FROM” sections of the email message.
- TO – email addresses for those students who have them
- CC – email addresses of the students' supervisors or Area Training Coordinators (ATCs)
- FROM – your email address
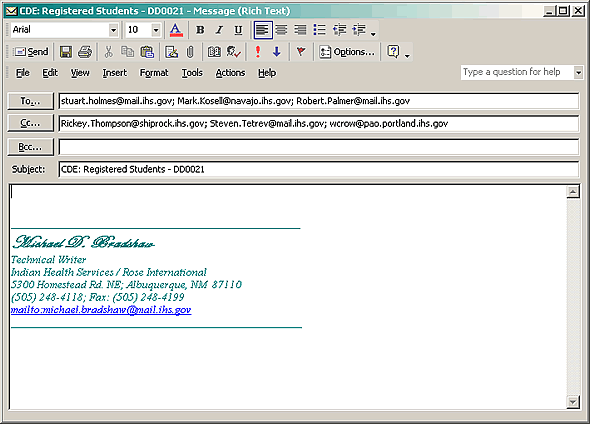
The CDE Administrator can edit the SUBJECT and the body of the email and send it to the email addresses indicated. She can even add addresses before sending the message.
Contacting an Individual: Student / Instructor / Course Director
Contacting an individual may also be required during any phase of the CDE workflow. For example, during the Catalog phase, the CDE Administrator may need to contact the Instructor or Course Director requesting a course review.
There are two ways of finding contact information for an individual:
- The Staff Detail page
- The Course Detail page
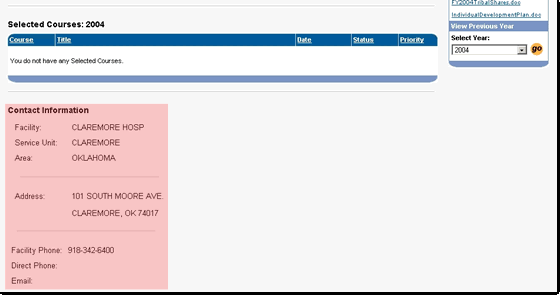
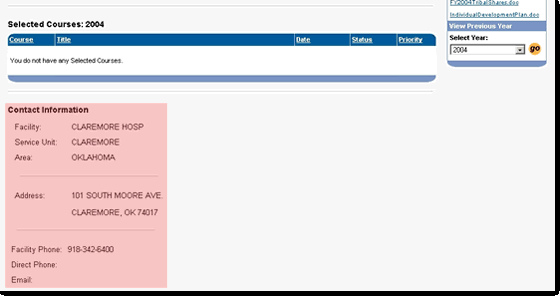
The Staff Detail Page
The Staff Detail page is similar to the My CDE page. It contains the specific information for a staff member. Go to the Staff Detail page for an individual by clicking the name on the Admin Staff page.
Near the bottom of the Staff Detail page is the contact information for the staff member. The CDE Administrator can use this information to contact a specific person using the most appropriate method.
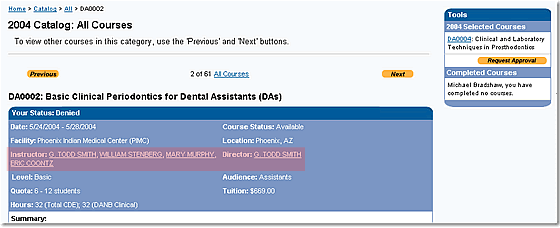
The Course Detail Page
The CDE Administrator can use the Admin Catalog to open the Course Detail page for a specific course. The main content of the Course Detail page includes the names of all instructors and the course director for the course. Clicking a name opens the contact information page for that individual.
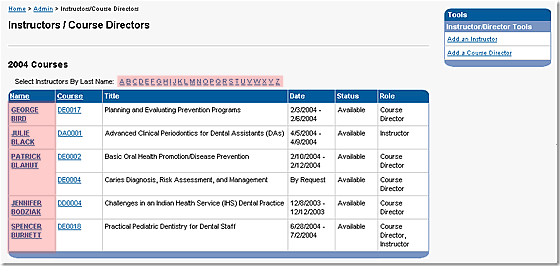
The Admin Instructors / Course Directors Page
The Admin Instructors / Course Directors page allows the CDE Administrator to view a list of instructors and course directors by selecting a letter corresponding to the first letter of the last name of the instructor / course director.
Clicking the name on the Admin Instructors / Course Directors page opens the Instructor Detail page, which provides the same information as the Admin Instructors / Course Directors page for the selected individual only.
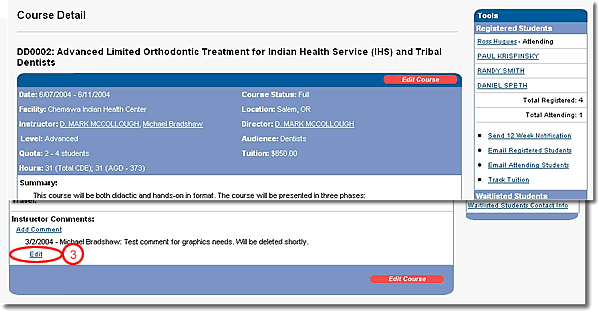
Course Comments
Instructors, Course Directors, and the CDE Administrator can add, edit, and delete comments within courses. Although comments are not required, they can provide important information and learning opportunities for students. Comments can include:
- Pre-class reading assignments
- Pre-tests
- Post-course activities lists
To add, edit, or delete a comment start on the Course Detail page. Keep in mind that only registered students can view these comments. The “Add Comment” link leads to a simple form that allows text entry and submission. The CDE system automatically adds your name and the date to the comment upon submission. The “Edit Comment” link leads to a similar form that allows both editing and deleting comments previously added.

“By Request” Courses
“By Request” courses are not like other courses in the catalog. The lottery does not populate the Registered Students list for these courses. They require the Course Director to add students before inputting attendance. If the Course Director cannot perform this task, the duty falls to the CDE Administrator. The CDE Administrator can add students to “By Request” courses during any phase of the CDE workflow.
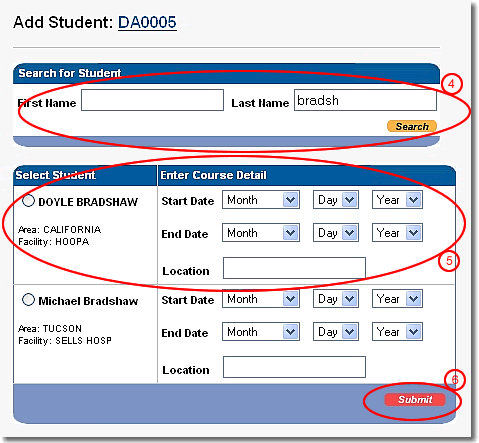
Adding Students to “By Request” Courses
To add a student, go to the Course Detail page. There are two links on the Course Detail page under the Registered Students list that we have not covered: “Add Student” and “Track Attendance.” Clicking the “Add Student” link opens the Add Student page, allowing the CDE Administrator to add a student to the Registered Students list.
The Add Student Page
The CDE web site allows addition of a single student at a time to a “By Request” course. The form used to add a student is the Add Student form.
The Add Student form provides spaces for entering a student's name, start date, and end date. “Submit” this form to add the student to the Registered Students list.
Tracking Course Attendance
The process of tracking attendance for a student is the same whether the lottery, the Course Director, or the CDE Administrator added the student to the course. The CDE web site provides a simple form for entry of attended hours and completion date. Clicking the “Track Attendance” link on the Course Detail page opens the Track Attendance page.
The Track Attendance Page
The Track Attendance page lists all attending students in the course. The user can enter attendance for a single student or for as many students as needed using this form.
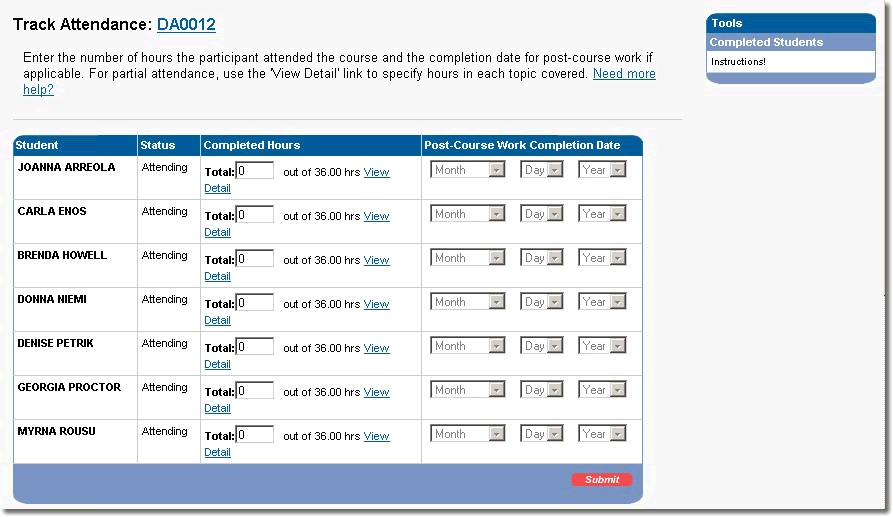
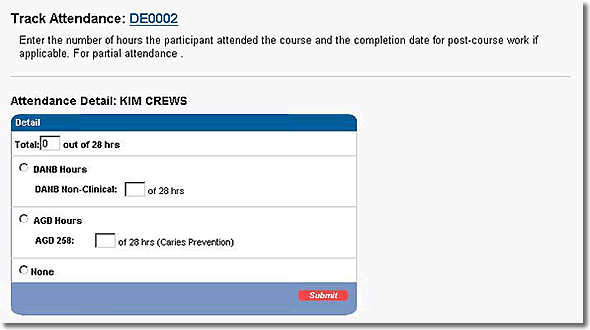
Another form is used for detailed information on students who partially attended the course and for courses that have the option of DANB or AGD hours. Clicking the “View Detail” link on the Track Attendance form opens the Attendance Detail page, providing a way to record partial attendance or specify between AGD and DANB hours.
The Attendance Detail Page
The Attendance Detail form allows entry of specific details on the number of DANB and AGD hours actually attended by the student. When the CDE Administrator submits the attendance for a student, the CDE system updates the student's transcript information, removes the name from the attending students list, and places the name in the “Completed Students” list on the Track Attendance form.
Summary
In this tutorial, you learned the basics of requesting approval for CDE courses based on the Continuing Dental Education (CDE) process. You explored the duties of all personnel during the Course Request and Approval, and Pre-Class phases of this process. Additionally, you examined the Lottery process.
You also learned how to read and use the following general CDE web site pages to support supervisors:
- CDE Home
- Edit Course
- Modify Status
- Quick Course Entry
- Overview
- Course Detail
Additionally, you learned how to read and use the following CDE web site pages to support instructors and Course Directors:
- Track Attendance
- Attendance Detail
- Add Student
- Add Comment
- Edit Comment
And finally, you learned the function of the following CDE Administrator-specific pages:
- Admin Catalog
- Admin Staff
- Admin System
- Admin Instructors / Course Directors
- New Catalog
- Add Course
- Copy Courses
- Add Announcement
- Edit Announcement